Showing posts with label Crafting. Show all posts

Thursday, April 7, 2011

Returning the Gift

For my birthday in February, my Mother-in-law surprised me with a wonderful gift. She used to make quilts, but is no longer able to work on them. She said she was waiting for the right person to come along to appreciate all of the fabrics she had collected when she was quilting. I am SO BLESSED that she felt that person was me! When my Handsome Prince came home with this trunk FULL of fabric I was like a kid in a candy store! The trunk is so full that the lid won't even shut. I had so much fun just going through the trunk and folding the fabrics, sorting by colors and stacking them back in to the trunk. There are so many BEAUTIFUL pieces to work with. I could hardly wait to get started. I knew what I wanted my first project to be - a quilt for Lois, made from some of these fabrics.
It turned out very pretty I think! I purchased a little bit of new fabric to help tie in the color scheme, but the majority of this quilt is made from scraps I found in the trunk. It is just the right size to keep your legs warm while watching tv or reading a book.


See how pretty the burgandy, brown and green works together? (The cross and fish fabric was new, the others came from the trunk)


This is the back of the quilt. There were two large pieces of this fabric, so I was fairly sure it was a pattern that Lois would like. Sure enough, when I gave her the quilt and she saw that fabric on the back she said it was one of her favorites.


I loved how the quilt turned out and so did my Mother-in-law. It was the perfect way to return the gift that meant so much to me!

Tuesday, April 5, 2011

A Quilt for Drexel

This past weekend I was honored to be invited to a VERY special baby shower. Our Niece and her husband are expecting their first child next month, a wonderful reason to CELEBRATE! Saturday was a beautiful day, warm temperatures (for a nice change!) and sunny skies made for a perfect Spring day to celebrate Misty and their new little addition. I found the perfect gift bag to coordinate with the nursery theme!


This is the bedding that Misty chose for Drexel's nursery. (Sorry, I don't know who to credit for the photo) This was all the inspiration that I needed to get started on my gift for them.

I think I came pretty close matching the fabrics with the look Misty is going for.
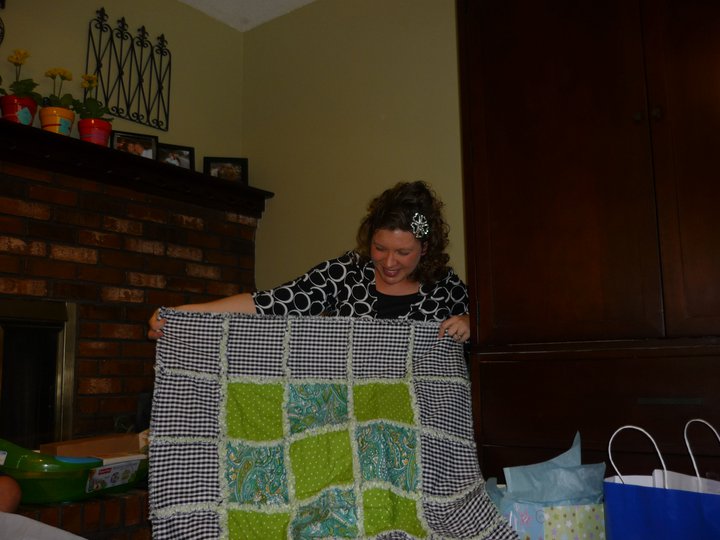
I made Drexel a rag quilt to snuggle in! It is washable, so he and Mommy can be fashionable on the go. The nice part (I think) is that every time you wash it the "rags" get a little fluffier.


A little closer view, ready to give to the Mommy to be!


And a little extra surprise for Mommy! She had seen photos of the first quilt I did for her - I was too excited to wait! So I purchased some lime green flannel and added it with the extra fabric I had left and made a smaller 5 square quilt for her too. I think you can tell that she liked it!


Congratulations Mike and Misty! I can't wait for that baby to get here now.

Monday, March 14, 2011

Purple Floral Quilt

Here is my latest quilt!

Each one I finish is "my Favorite", but I really like how this one looks! Purple is one of my favorite colors, so when I spotted this flannel fabric I knew I had to make something with it. I wanted to try a little smaller sized quilt, and I am pleased with this 5 by 5 block size. It will be perfect to snuggle a beautiful baby girl!


The back is this pretty lilac flannel.


Close up of the front of the quilt.


This quilt is for sale for $55.00. The finished size is approximately 36" by 36".
I am taking custom orders! You may choose whether you want cotton, flannel or a combination of the two in your colors. Just leave me a comment and we can work out the details!

Monday, February 28, 2011

A New Hobby

I have always been a "crafty" sort of person - I love making something out of nothing! When I was growing up I loved watching my Grandma as she would take scraps of fabric and create a beautiful quilt. She was very proud of the fact that she made a quilt for each of her grandchildren as a wedding gift.

I tried to quilt once before, but I started out thinking I could make a king size wedding ring quilt and I quickly became discouraged and gave up. Recently I came across instructions for a rag quilt. It was just the right size project to try. Especially considering that there is a mini baby boom going on in our family right now!

The weather this winter has been CRAZY! However, it has made it very enjoyable to sit at the sewing machine and create some custom gifts for babies, and a special lap quilt for when you need "just a little something" to take the chill off. I thought I would share a few pictures (Okay, a LOT) of my new hobby.

These are the colors my Niece is using in their son's nursery. I took this photo when I just about had it all cut out. I am SO GLAD I have the rotary cutter and mat!

My little sewing center :)
Here are the blocks all pinned together and ready to sew.


I had to lay it out on the floor and number each row so that I was sure to sew them together in the right order.


And here it is ready to give to the Mom-to-be!


That project got me so excited I decided to try one in flannel fabrics too. It turned out VERY cute!
I chose greens and yellow for this quilt since I didn't know if it was for a boy or girl.

It is so warm and snuggly!


The baby feet fabric on the back is adorable!


I have been officially bitten by the quilting bug! I did this one just because I loved these prints together.


Clipping all of those seams takes time, but gives the quilt such a unique look.


I love how this turned out!


My Mom loves yellow and blue, so it isn't hard to figure out who this is for! Butterflies are also one of her favorites, so when I saw this fabric I knew I had to have it.


It turned out very pretty I think!


I am selling the cotton quilts for $55.00 and the flannel quilts are $65. I would be happy to ship to you for an additional fee. I currently have about a two week turn around on new orders. Leave me a comment if you would like more information or would like to place an order.

Monday, April 20, 2009

The Topiary Project - Complete!

Happy Monday! I hope you had a great weekend.

We went out to eat on Saturday evening with our good friends Bob and Lisa. We wanted to try Crabby's because none of us had been there yet, and we like to try new places once in awhile! OH! MY GOODNESS! The food was so good! I would HIGHLY recommend.

Last week I showed you how I made a Topiary. I told you that I needed another fern for the tall one, and I had not done the shorter one yet. For accountability's sake, today I present the finished products!

A closer view of the shorter one...

The taller one with it's extra fern...

Such an easy project, and so much fun! Plus I have the satisfaction of knowing I spent less than $50.00 for supplies to make TWO (with leftover supplies to make at least one more) and the inspiration for this whole project was priced $169.95 and wasn't as tall as the base of my shorter one. HA!

Monday, April 13, 2009

Another Craft Project: Topiary

Happy Monday!
I hope you had a great Easter! We had a wonderful weekend. Got a lot of things done around the house, and shared a fabulous meal with my family. Mom had ham and potatoes - Yummy!

On a recent trip to my favorite project store - AKA Hobby Lobby - I spotted the most gorgeous topiary, EVER. Then I saw the price tag, and was certain I was reading that WRONG. Over $100.00 instantly put it out of my price range, even if it did ever make it to a Half Price sale, or a 40% off coupon. The things I loved about it were the iron base, and a Fleur Di Leis finial they had put on top.

I put my "thinking cap" on, and went to the 80% off aisle! I found two heavy iron candle sticks marked down to $6.00 and $8.00. NOW We're TALKIN'! Off to the floral department where I grabbed some of the green Styrofoam balls in two different sizes and a few kinds of moss. The silk bushes were 50% off and I found a fern that looked fairly realistic. Now I needed a finial, so off to the aisle with the drawer pulls, also 50% off. I couldn't find a Fleur Di Leis that would work, but for $2, I liked this one just fine! So for less than $30.00 I have enough materials for TWO topiaries! Much better price, and my Good Friend HGG (hot glue gun) has been missing me anyway! Here's what I started with:


I used Spanish moss on the larger ball that I will use as my base. Work in small sections, putting some glue on the Styrofoam and CAREFULLY place a handful of moss on it. Remember, it is called a HOT glue gun for a reason! :) But it also works the best. I tried the spray adhesive and it doesn't hold as well for this project. For the top ball I used a lime green Reindeer moss.


Once I had the moss glued on both of the Styrofoam balls, I had the Handsome Prince bring me in a stick from the yard. He whittled it a bit on each end to form a point, making it easier to stick in to the foam ball. I cut the silk fern apart, and stuck it in to the Styrofoam. I actually think I need one more, so that will be an outing later this week. To finish it off, I stuck the drawer pull on top!

One down, and one (the shorter one) to go! This is where I decided I had better glue this to the candlestick, because we were leaning just a bit. The picture below is after the glue.

I'm pretty pleased with how this turned out. I'll finish the other one this week, and hopefully have after photos for you then!

Tuesday, March 10, 2009

Painted Easter Eggs

I love Spring!
Easter is right up there with Christmas and Thanksgiving for my FAVORITE Holidays. So when I ran across these eggs at The LOB I knew I just HAD to have them! They are in the Easter decor aisle, right at the front of the store. I'm not certain what they are made of, I think they are paper mache that they have painted all different pastel colors. The egg is very light weight. I think they are cute just as they are, BUT I wanted to make them even BETTER! I am a firm believer in MORE is BETTER!

I purchased some regular acrylic craft paint. Make sure that it says it works on any surface. I got out some brushes and let my creativity flow! I wanted them to all be different, so I just started free hand making lines and flowers.

My glitter glue pens added a little Bling to each egg. I would draw the glitter on over the paint, and then I used a toothpick to move the glitter around where I wanted it. This also helped to get the air bubbles out. The pens I used were Elmer's, I found them at Wal*Mart with the children's coloring supplies.

See how pretty those swirls are now?

For the Polka dots, I used the other end of the brush, dipped it in the paint and just randomly made the circles all over the egg. I could make all different sizes just by moving the tip of the brush around a bit. Of course, it had to have a little glitter too! The circles actually took a LOT longer to add the bling to, so that would be why I only did one color :). The toothpick is your best friend with this project! You can see where an air bubble blew out too much glitter, I had to improvise a bit!

My Handsome Prince wanted me to try a patchwork egg. I used a pencil to make my square "pattern". The eggs are erasable too! It did help to have a guideline, and then I just randomly painted squares different colors. If I ended up with a certain color side by side, or too close together, I painted over it once it dried. DON'T be SCARED! You could do this too!

The glitter helped to cover some of my lines that weren't exactly perfect! This is probably my favorite!

Easter eggs always have zig-zags on them! I'm not quite finished with this one, but I was far enough along to share it with you. I used the pencil once again to help me make the bands. I made three different sizes, top, middle and bottom. I painted the bands first, then came back and made V's all around them, letting each color dry before adding the next.

I'm just finishing up with the glitter on this pretty baby, and then it will be done. I think I am going after two more eggs tonight. This has been so much fun, and I still have a few more ideas I want to try!

This was really an inexpensive project. We don't do the colored, boiled eggs at our house since we don't have any little ones. And these will last me for years - without the SMELL!

Monday, March 9, 2009

Jaxon Update and another craft project

First of all, I want to say a HUGE THANK YOU! for your prayers for my nephew Jaxon. He was diagnosed very quickly, responded to the medication and was sent home late Sunday evening. PRAISE GOD! The Doctors anticipate a FULL Recovery, after about a month of medication. Thank you so very much for all your prayers for my family!


Here's a little preview of my latest craft project. I bought these eggs at my favorite craft store, AKA Hobby Lobby! I liked the size of them, but they were a little too plain. So I grabbed up some craft paint while I was there.
Here they are in various stages of "done-ness"! I've gotten very creative at finding things to prop them in while drying!

I already had some glitter glue from a long ago project. This is working perfectly to add a "little Bling" to my Easter Eggs!

It has been kind of fun having these to work on a little each night while we are keeping up with our intense Reality TV schedule! I'm just about finished with these bigger eggs, and I have started on some adorable smaller ones. I'll post pictures when I 'm done!

Sunday, February 22, 2009

Happy Birthday to ME!

Today is my Birthday! Happy Birthday to ME!

I'm a firm believer in a Birthday Extravaganza. Birthdays SHOULD be CELEBRATED! You've made it another year! And it sure beats the option! In honor of my big day, I thought I would share some cake with you! I have picked out a few that looked really good to me. Grab some coffee and share in the festivities!

Doesn't this look like a fun time is about to be had? I had the best parties when I was little. Mom and Dad always made a big deal out of our special day. We would get to pick our very favorite thing to eat and Mom would make us a wonderful meal. Daddy didn't care for spaghetti too much, but he would be a good sport if that was our choice!


My birthday is on the same day that the Father of our Great Country, George Washington was born. Some other famous people that I share a birthday with are Julius "Dr. J" Erving, Steve Irwin (The Crocodile Hunter), Drew Barrymore and Senator Edward Kennedy. Quite an eclectic bunch there!


I am not quite ready for this cake! I still have a couple of years to prepare for that one. I will honestly say that my age doesn't bother me. It's just a number! I feel very Thankful and Blessed to still be celebrating. God has more plans for me!

This one might be my favorite! I'd say there is something for almost everyone here!


I bet this one tastes as good as it looks! My choice of cake would definitely be CHOCOLATE! German Chocolate with coconut pecan icing - YUMMY!

This looks like something my Handsome Prince would do! HA!

Enjoy your Sunday! I'll have a Birthday Festival Recap for you tomorrow!